Table Of Content

Like the rail, the cogwheel is bent so you need to straighten it out. Head back to the workbench and rotate the segments of the straightening device to form a circle upon which you can place the cogwheel. Zoom out and pan to the left side of the workbench, where you will find a lever.
Can I return to previous chapters to collect missed items or solve puzzles?
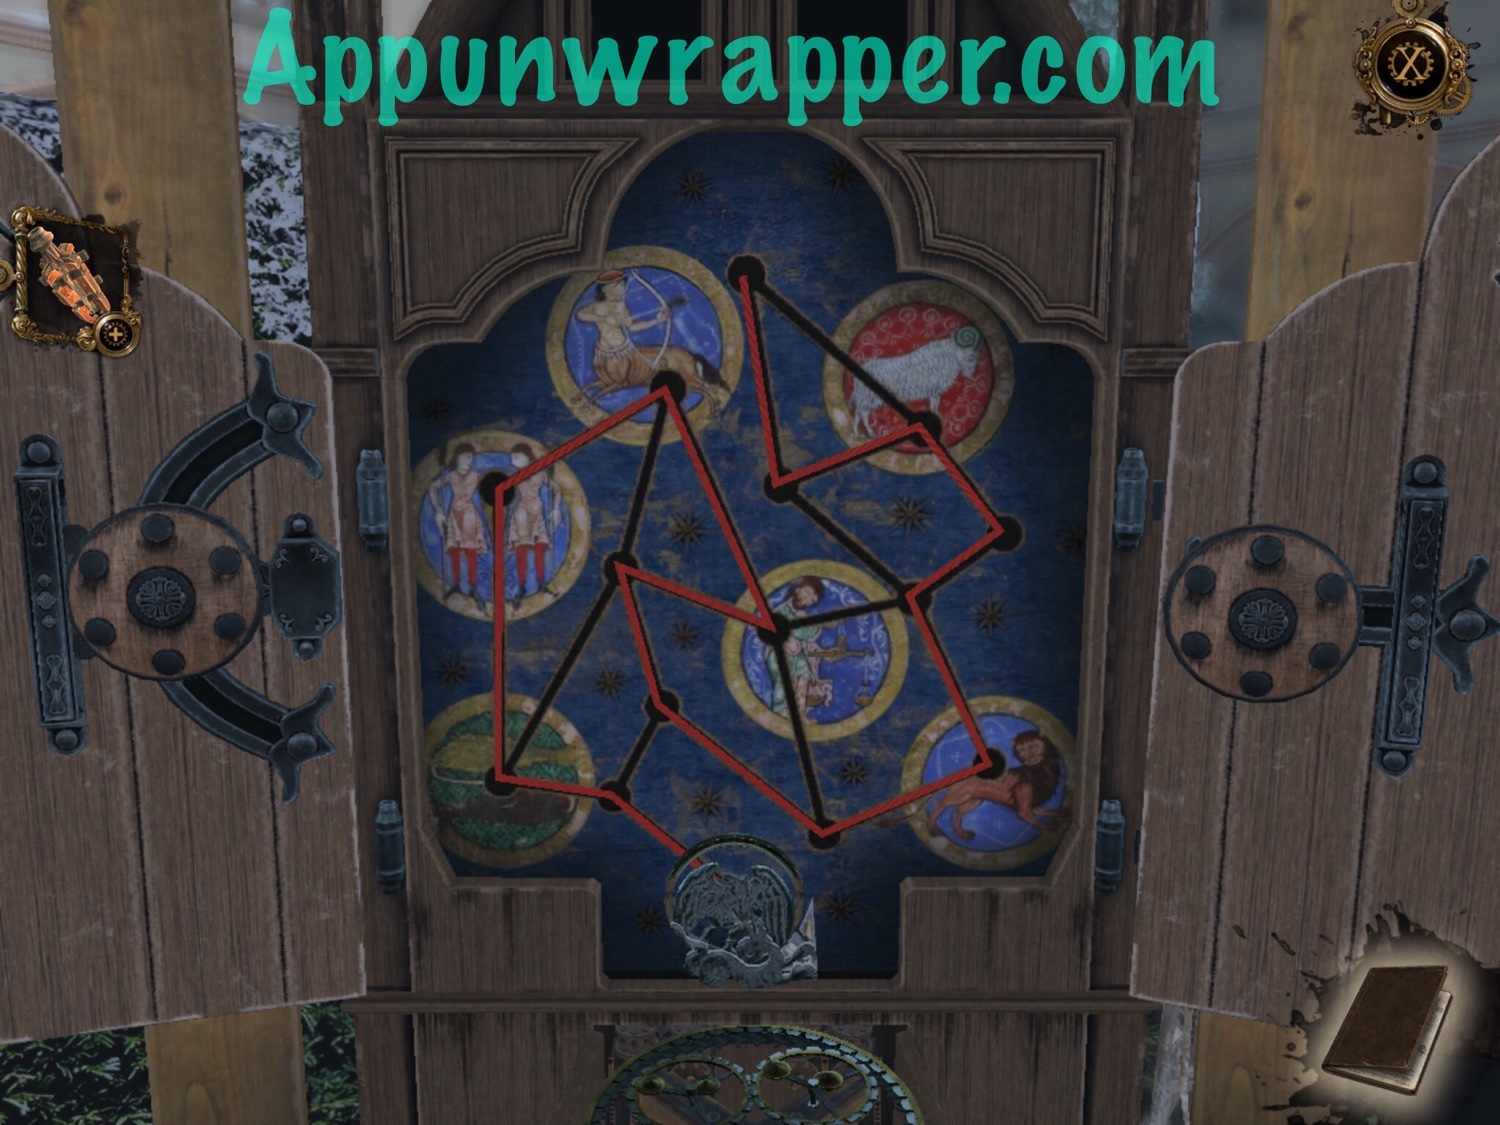
The game will focus your attention on the bent rail. Use the Oculi Tempus and trace the shape, then adjust the time-line until you see a glowing sketch. Rotate the discs until you recreate the drawing of the Vitruvian Man.
Tower
First turn the middle90 degrees, the left 45 degrees clockwise and the right 45 degreescounterclockwise.You can now slide the shield out, take theshield out of the drawer to the side of the globe. Zoom in on the ringat the bottom left, also this is closed but there is a button on the ring.Slide the knob to theother side and the ring is now open, pull the magic lens back up. First turn the ringso that the surfaces connect, then the top button.If they are in theright position, the disc pops up, pull it open completely.Inside you will findmetal sun, grab this sun. Take out theornament, click it in your inventory and then pull the handle up.The square bottom isnow octagonal, zoom out completely and turn to the lamp. Then back up againand down again on the last panel.
Downtown Los Angeles, California Apartments at The Da Vinci
Back away from the suit of armor, then enter the next room and turn right. Walk towards the large wooden doors, then turn left and approach a small wooden cabinet with 3 panels. Insert your lever with a triangular shaft into the left panel, then pull it upwards - this will raise the left cage over the sarcophagus. Next examine the top of the scythe, and use your screwdriver on it, then rotate the screwdriver anticlockwise. After the blade drops down, take out the strange key that is revealed.
Head downstairs once more and approach the number I. Insert the lever at the top of the vertical pipe here. You need to move the lever around to align the inner mechanisms.
Chapter 2: The Lamp Post and Scroll Seal
Back out again and focus just beneath the panel you pulled open, pressing the button in the middle of the rose. Look up to the open panel above, grabbing the disc with a long groove. Go down to the puzzle below and insert the disc with a long groove here. Use this to rearrange the 4 numbered pieces to match the adjacent numbers.
With all of them now properly mounted, the Oculus Perpetua’s parts will all shift and fall into place automatically. Release the repaired Oculus Perpetua from the circular device by turning the knob. The orb will roll off but you’ll be able to catch it just in time. Turn to the device holding the rest of the Oculus Perpetua.
Look back at the opened helmet and use the Oculi Infinitum. Drag the left gear down and rotate it clockwise, then drag the right gear down and rotate it anticlockwise. Take out the fine wooden ornament, which is in the shape of a rose. Drag the cogwheel on top of the circular shape and push the workbench’s lever to the left. When the device is done straightening out the cogwheel, it will return to your inventory upon collection. Since the incomplete Oculus cover has a + symbol, access the inventory and drag the cogwheel onto the incomplete cover.
Chapter 4: Latin Clues and the Door Sequence
Set the numbers to the Fibonacci sequence from bottom to top (I, II, III, V, VIII, XIII). Pull open the bottom segment of the tower and take out part of Da Vinci's model. Focus on the top of the tower and insert this part. Pick up the hexagonal metal object that is revealed. Examine this in your inventory and twist the handle to turn it into a star-shaped medallion. Insert this into the back of the tower, then slide it down.
Rotate around to the left side of the wooden box, and focus on some more scratches near the middle. Rotate the metal latch here to reveal a small hole. Insert your small cross-shaped item and turn it anticlockwise, then take the folding key that appears above. Examine this in your inventory and open it so it becomes and unfolded key. Look up to the top of the cabinet and insert the tetrahedron into the triangular hole, then pull open the panel and a puzzle will be revealed below. Back out again and focus on the panel you pulled open, grabbing the disc with grooves.
Turn the knob thatyou see around until the 2 arrow points point to each other, you will see thebars disappear.Zoom out again (2x)and then zoom in again on the spire. A cylinder now comesout, on top you see a valve and 2 locks.Zoom in on the flapand open the locks, slide the flap backwards. When this is done,the circle turns around and you will find an opening for the crank.
Use your Oculi Infinitum and turn the crank to line up the images on the right. Turn the small wheel at the back of the siege tower, then use the trigger again to light another flame in the distance. Go over to the blue curtain near the new flame and pull the cord to reveal a tall wooden cabinet.
The device will automatically return to its default setup, and you’re free to claim the rail for your inventory. Fasten the end of the rope to the side of the chandelier. When you go back to the circular crank and turn it, the rope will tighten and lift the chandelier, then make it smash against the statue in front of it. After being unbolted, some rope would hang loosely from the ceiling and fall to the ground. Now that you’ve established what you need to do, you turn your attention back to the statue and give it a mighty push by holding your finger over the icon serving as a prompt. Upon getting close to the statue, the game will direct you to an object on top of it.
Back out 4 times so you are at the top of the stairs, then look left and go to the workbench. Focus on the front of the table - attach your wheel with four handles, then turn it clockwise until you can remove the barrel screw. Now look at the next device to the right, and insert the barrel screw here. Turn this clockwise, then open the gate and pull the lever to lower a shelf nearby. Go to the shelf and pick up another wheel and a wooden box. Back out again, then focus on the left corner of the green pedestal.
With the cover now complete, drag this part onto the device holding the other parts. Turn your attention to the statue next and give it a push. The bricks would come loose, revealing a secret room that looks like a mini-workshop. The first thing you will notice is a workbench with a couple of items on top of it.


No comments:
Post a Comment